Pages

Showing posts with label homemade gift. Show all posts

Friday, March 8, 2013

E- Eggs for Ostara


I colored eggs with lots of different natural dyes last year, some worked well, some did not.

This year I gave up on spinach, carrot and turmeric and made eggs colored with the things that worked best last year.

Black tea.

Black walnut hulls.

Onion Skins.

And my favorite:

Red cabbage!

This makes a beautiful dark purple blue that becomes bluer as it sits overnight. The high ph of the eggshell turns it a gorgeous shade of blue. Here is how I did it:


Chop up half a red cabbage from the grocery. put it in enough water to cover. boil one hour, adding water to keep it covered. 
Magic floating egg cartons!
Strain the pale purple chopped cabbage from the dark water. I served my cooked cabbage for dinner with vinegar and sugar and black pepper. 

The water looks really dark but it takes a long time to color the eggs.

Cool the liquid and add raw white eggs and 1/2 tsp salt. Boil the eggs the same way you make hard boiled eggs. remove the pot from the heat, add 1 tbsp vinegar and leave in the water overnight. If you plan to eat the eggs, do this overnight int he fridge.
When you remove the eggs from the vinegar water they will be purplish but  in the air they will become bluer.
Eggs in cabbage vinegar water.
I love the reflection .

Voila! Gorgeous eggs.  The lighter blue ones were cooked in the same water the next day. I bet I could have made another batch in that water, but I needed the pot.


Really big beets. No dice.


Beets were disappointing. They stained me, the counter, spoon and cutting board red but the eggs came out beige! I tried twice, because I am stubborn. I recolored those eggs with more onion skins.

Dilute onion skin water- maybe yellow?


The four red and gold ones at the top of the egg box and all of the ones in the box to the right were colored with the skins from one bag of yellow onions. Boiled in the colored water and then soaked overnight, they are almost red, especially if you begin with brown eggs!

The pale greenish ones are calendula flower petals- unimpresive to me. I overdyed two of those in cabbage water- they are army green.

Another way to decorate eggs is the PA Deutsche traditional scratched design. It is an art that began in Europe and came here in the 18th Century, but has nearly died out now.

You can see one I began working on in the bowl of really dark colored eggs I made just for scratching. Black tea or walnut hulls for browns, cabbage for the navy blue-black ones, the red are onion skin.

Scratched eggs will be for another post, but that is why I made the very dark colored eggs.
It's snowing right now, but I am going camping tomorrow and bringing these to the 18th C farm we are staying on. I will scratch them with traditional 18th C patterns representing power and blessings of the returning Spring. There are a few extant examples and a few reports of the work, but several  19th C newspaper photographs and reports of family eggs handed down 3 generations. The ones thought to bestow power or blessings were traditionally not kept but broken and buried when the work was done. 

Thursday, February 14, 2013

Art & Love part 2

Watercolor study of reds.  I wrote "I love you" all around in the shape of a heart.

When last you saw the parts for the woven valentine I made this year there were cut strips of papers I have inked and painted, a love letter, some "I love you" messages and a big pastel heart.

The background is mainly light and the foreground mainly dark.  
The heart of "I love you" on the dark red paper overlaps with the red pastel heart on the long background strips, but after weaving a few inches I can see that it doesn't read as a heart.  The contrast of the light and dark highlights the weaving but the heart is too delicate.  It needs repetition, something to show the eye where to look for the angles of the heart design.

There are plenty of touches of orange in the paper, so I chose to paste a yellow watercolor heart cut from my paper stash onto the background.  I then repeated the pastel drawing of a heart on that.  That should do it.

The weaving pattern is called a 2/2 twill.
Strip by strip I cut and then wove my messages and images and colors together.  

I like the way the yellow heart is not traditional, but makes the whole thing bright and cheery.  Like a little sun.

I considered writing on the heart too, but I decided against it because this is busy enough.  


There has to be a few places where your eye can rest, not just work, work, work to read and understand.


Happy Valentine's Day.


Not just to my loves but to my readers and Valentine's Blog Party friends too!


Tuesday, February 12, 2013

Butter Girl gives Thanks

Over at Modern Alternative Mama I read this post about Prayers for Praising not Pleas.  I spend a lot of time thanking the Goddess for what I have and what I have been through, both good and bad.

I don't like the pressure on either of us to give a fancy "just right" valentine so each year I try to make one.
This is a ransom note I made for Bearded Bob a few years ago from a wood cutout, magazine cutouts
 and a beautiful folded paper lobster. It is hard to read, but it is signed: Butter Girl.
I managed to stumble my way onto the idea that focusing on the HAVE and not the NEED TO HAVE would make me happier (with the help of a wonderful spouse, marriage therapy and some really bad examples of marriages around me).  Then, it was just a matter of spending most of 20 years figuring out how to make my head stop collecting mistakes and start collecting triumph.

Oh how I wish I had seen that post about list making when I was a newlywed!   It is the formula for a really sincere Valentine, so I have shared it over at The Valentine's Blog Party.

Monday, February 11, 2013

New Pagan Art Journal

I am so delighted to participate in the 52 Weeks of Pagan Art Journaling Project that I decided I didn't want to just start cramming my entries into my regular daily journal.  So, in typical overachiever style I made a journal just for the project.
I cut 15 pages to size for the outside of each signature so the spine would be uniform looking.  I pressed each fold crisp with the bone folder visible on the top of the stack.  The distracting pile of sketchpads was there to supply paper and later to provide pressing weight on top of the bull dog clips. 
I stitched signatures made of all different kinds of paper together, just to begin with some variety already built in to my new journal.  I've been kicking this idea around for a while but I admit I usually make books in a big hurry for a gift or specific need.  For this book I had time to go slowly and play with papers, and I did.

I used a few watercolor monochrome pages I painted and stored to use when I needed some texture and color but not a specific picture.  Last year I bought a book of card stock with general monochrome print backgrounds from a bin of discount scrapbook paper and have hardly found a use for it so that got cut up too.  Along with ivory colored sketch paper, these made the bulk of the 10" x 14" sheets which folded to 10" x 7" pages.  After that, I added some envelopes, partial sheets of plain watercolor paper and a few pages of odd sized brown craft papers.  There are 15 signatures of 3 pages each, one or two have 4 pages.  That should be plenty for 52 entries even with a few duds I cut out and remake!
I folded the signatures together and added a smaller page or envelope to most of them.

After folding the signatures and adding the odd sized pages I pressed them well again with a bone folder.  Then I taped the three linen tapes for the spine to my work surface and stacked them in the order I wanted them to appear in the book.


I made a card with marks where the holes should go near the ends and beside the tapes.


You can see the card with the hole markings here, and the punched holes beside it.
I added arrows to make the marks more visible for the picture.


Then I took each signature off the pile and punched holes in the fold through all the page layers.  I used a magazine opened to the middle to make a place to lay the fold and punch into it.
Row of holes ready to stitch and linen tapes attached to
 the surface below the work.  Beeswax and linen thread on top ready to go.


 I stacked them back up in order and then moved the whole pile to the side.


My assistant was no help whatsoever.
 As soon as she realized that my awl had an antler handle
she forgot all about hole punching until she was caught.


After all of the holes are punched and you have the pages in the order you like them you stitch along the length of each signature and tie it to the one below.


As you stitch around the cloth tape at the spine you form a flexible back edge that will open well for writing or drawing.


Leaving the tail on the outside you bring the needle through the first hole to the inside, then in and out along the row of holes.


Tie the starting tail to the thread as it exits the hole on that end the next row.  After that, loop a stitch around the row below on the outside each time you reach the end of a row.  The pictures below show the linked end stitches one above the other.


Sew the waxed thread through the pre-punched holes in each fold.  

Pull the thread to the outside and be sure to go around the outside of each tape.  Keep everything nice and snug.


In, out around each tape. 


 It takes time to keep layering and sewing the folded signatures on one at a time, but it makes for such a neat stack.

I used tapes on the spine instead of a heavy doubled thread because I want to leave the spine exposed as a pretty design element of the journal.
Here you can see the stitches going around the tape for each new folded signature added.  You can also see the stack of linked stitches on the end holes. Each end hole stitch is attached by looping it through the stitch below it. 
I used bulldog clips to further press the whole stack
 for a few hours and tugged the tape snug .  
To hold the tapes down on the outsides of the text block I have just made, I used PVA glue to add a piece of thin linen fabric to each side.  This is actually a folded strip of handkerchief linen, because I want a neater folded edge to show near the exposed spine.
 The spine with the glued linen strips was shielded with parchment paper to keep it from sticking to everything and pressed between the boards with the bulldog clips again.


Here is the whole stitched book.  You can see how many of the pages are full size but there are heavy watercolor paper strips and all kinds of other things in there.  I hope that running into the different papers is a good challenge to inspire me to try different techniques and approaches all year.

Sometimes staring at another blank page just sends me into a creative straight-jacket!


This looks pretty inspiring to me now.
The spine is really flexible and pretty.  You can see the tapes glued down under the strips of fabric front and back.

Covers are glued to folded endpapers inside the front and back page.
The covers I have were reclaimed from another journal with really cheap, absorbent and yucky recycled paper.  Everything I did on that paper just smeared and wrinkled and made me feel helpless.  I was so glad when I realized the problem was mostly the pulpy paper!!

These covers are 10"x 7" with holes from a spiral binding.  I haven't decided yet what to do about the holes.  They could have beads stitched into them or ribbons laced through them, but that will make it hard to shelve this journal later.  I don't have to decide about the cover today.  Eventually it will be covered with a brown striped silk book cover paper I have.

You can find great instructions step by step for making bound and stitched books at T. J. Bookarts.

If you are doing the 52 Weeks of Pagan Art Journaling this year, please leave your link for me to go see it!

Friday, January 11, 2013

A is for Amulet charm bundle

Many years ago I wondered what a REAL Book of Shadows looked like. Mine looks like this. 
Amulets are one of my favorite things to make, and a really nice way to bear in mind an intention you are working to make real. They are like little tangible thoughts, and may be accompanied by gestures, words or sigils. A charm can just BE a word or sigil, it you desire. If it is a word, you can time it so it is said at the perfect moment, when the sun just sets or when you drop a bulb into a hole. 

The charms I make address a specific intent, like protection, love or attraction.  The right time of the moon is always taken into consideration, waning, waxing or Full. I don't make charms on the New moon, it is time for other things. I think of a charm as an offering for the Goddess I ask to help, a focus to frequently remind me of the intention I held while making it and to act as a passive reminder.  In my studies of local Pennsylvania and other rural folk magic and medicine there is frequent use of verbal and bundle charms. The amulet I am sharing today is a bundle charm.

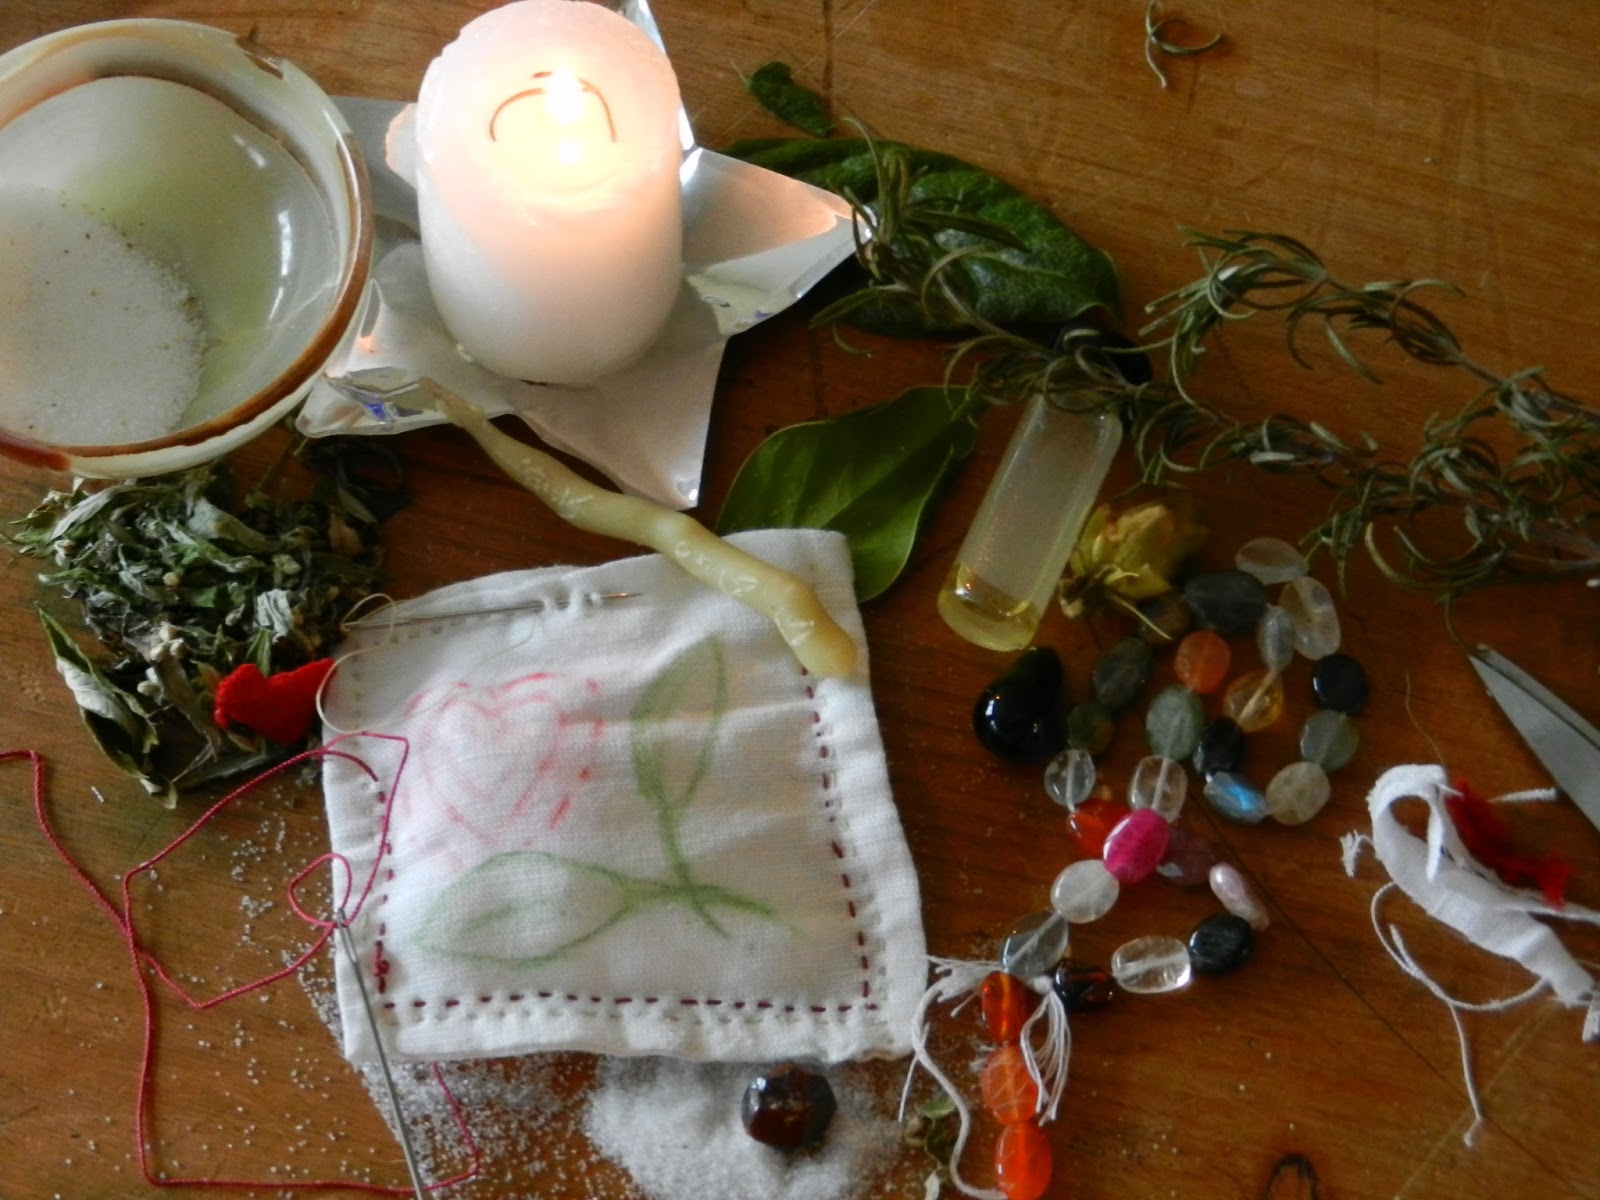
Hand sewing is something I love, it is meditative and takes time. So, I gather my hand sewing supplies and some linen fabric too make the outside of the amulet, the bag. 
Using a rectangle about 2" by 4" folded it in half I stitch around the outside edge on two sides. One side is open, so the square is turned inside out, edges pressed with the bone folder (in the picture I have one carved like a feather) and stitched again with linen thread all the way around 3 sides. Fold the raw edges of the forth side in and stitch it partway shut.  These two seams are tight enough to hold herbs or salt inside the bag.

Now is the time to get the rest of the amulet supplies you will need. You know what you need to do your magic work, I can only show you a bit of what you might find here.

I gather my sewing supplies and stitch two sides of my folded linen rectangle using plain thread. Also pictured, red silk thread, needle case with spare horn buttons attached, carved bone folder, blue checked linen I didn't need today, thimble.
 Folk magic uses red thread and salt frequently, so before I begin the filling I make a final round of stitches using red silk thread. My desire is knotted into the red thread, in this case I made 5 knots, you can see them in the last picture. I stopped the red stitches short of the opening too. Salt, rosemary, quartz, a tiny felt heart and my words to Brigid and Aphrodidte went inside.
Linen fabric, sewing tools, little gemstones (I buy them on strings) salt, anointing oil, your hair, or your written intent could go into the amulet. I also included herbs and a small candle made of beeswax and an old earring from my hubby.

Note to the goddesses I am addressing on linen.
String of gems to choose from. Anointing oil and salt.
On different page of my BOS I recorded the details of a special
amulet a fellow asked me to make for his uniform coat.


 Include what ever things support your intentions and work to your purpose.
Of course the salt goes everywhere! Mugwort, rosemary, garnet and red wool heart went in next along with the candle.
When filled and stitched, my amulet was dedicated  and anointed before I put out the candle I used to focus.
See the place of 5 little knots in the red thread?


The soldier's protection and wholeness amulet was sewn within the coat itself, but you can feel it through the pocket.

Carry yours in your pocket or around your neck, or place it in a room or in the garden.


Wednesday, December 21, 2011

Pomander Bath Fizz

Real pomanders started in Renascence Europe and mean "apple of amber".
They were carried about to keep dangerous vapors away.

Scented Solsitice gifts are the way to satisfy my creative urges during this week of holiday bustle. This year's offerings include bath treats for my sister and daughter. Each of them are seriously hip, work like devils at high pressure jobs one on Wall Street and as one as Director of pretty-much-everything in a city hospital. They fly back and forth between NYC and Austin TX to visit one another for concerts and weekend getaways. To them, I am the shining example of the slow, centered life.
This year's offering, in addition to my already famous Rosemary and Lemon shampoo (I don't provide conditioner because everyone is so fussy about her own, but I one day hope to make one using Argan Oil, probably scented to match the shampoo) I am making Bath Bombs, those fizzy balls you toss into the bath to create havoc and scent. In the past I have searched for scented products one could add to the whirlpool without creating a souffle of suds. Finally, I realized that with just my own essential oils (which I already have for scent and Craft uses) I can have fancy bath toys for myself and my hip-girls.

1 ounce Sweet Orange Essence EO
1/2 ounce Lime Essence EO
1/2 ounce Tangerine Essence EO
We make pomanders by poking holes for cloves into oranges
with a skewer. They represent the Sun we miss during the Winter.
1/2 ounce Lemon Essence EO
1/16th ounce Cinnamon Bark tincture*
1/8th ounce Allspice tincture*
1/8th ounce Ginger EO
1/8th ounce Clove Bud Absolute
  • Mix 1/2C Epsom salt (or Epsom and sea salt mixture for a variety in texture) with 
  • Citric acid 1/2C
  • Baking soda  1/2C
  • Cornstarch 1/2C
  • 15 drops total of the above essential oil (EO) recipe. 
  • add 1/2 teaspoon of Jojoba oil as a carrier oil.
  • add one drop at a time of food color of you like, I do not.
  • add 1/4 teaspoon fine grind orange peel or crushed cloves, also optional, this will not dissolve.
  • mix mix mix.
with molding form (muffin tin, ice cream sccop) ready, add
  • 1/2 teaspoon (or slightly more) of water from a spray bottle.
Mix with your hands, quickly form into balls or pack into shaped molds. it does not take long to harden. Turn out onto foil and let stand 1 day. Wrap. Impress those hip chicks.
Be aware, this scent recipe makes what might be a lifetime supply of Solstice Pomander scent. Terrific if you are interested in making room spray, perfume bath oils and bath bombs for scent layering for several people's gifts.  Not terrific if you want only 2 big bath bombs.  Reduce recipe by proportion by substituting 8 drops for each 1 oz of EO (essential Oil). *Tinctures are something I can make using 1/2 oz high proof vodka with the dry spice.